
Java Messaging Service (JMS) Introduction
Java Messaging Service (JMS) provides a mechanism for applications to create, send and receive messages using reliable, asynchronous and loosely coupled communication. JMS is defined as part of the Java Enterprise Edition.
JMS supports two messaging models, point-to-point model and the publish subscribe model. In the point to point messaging model we have a message queue and there is one consumer for the messages, but there could be multiple producers writing to the message queue. The publish subscribe message model is more like a bulletin board where there could be multiple consumers for a message. JMS client address messages to a Topic.
Some of the common terminology used with JMS applications is listed below.
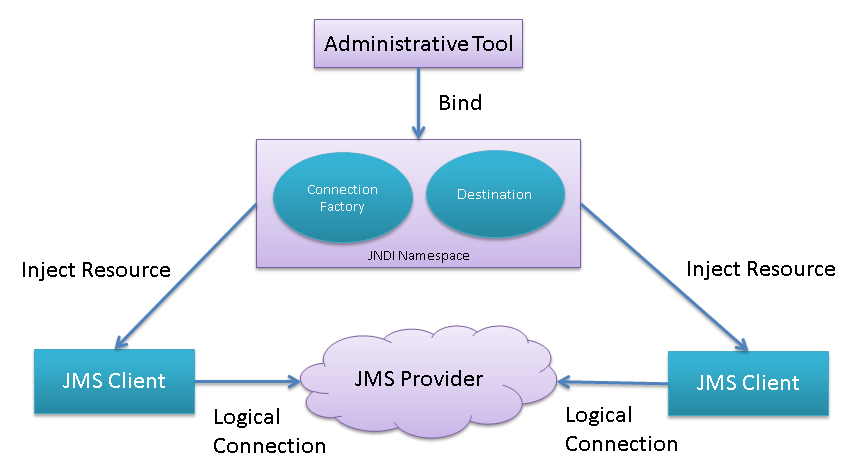
- JMS Provider The underlying messaging system that implements the JMS APIs and supports the administrative and control features. ActiveMQ is a JMS Provider.
- JMS Client An application that produces or consumes messages.
- Message Objects used for communication between JMS clients.
- Administrative Objects Preconfigured objects like connection factories and destinations that are created by an administrator and used by clients.
ActiveMQ Introduction and Configuration
ApacheMQ is a popular and powerful open source messaging provider and fully supports the JMS API specifications. There are several other JMS providers including Oracle Weblogic, WebSphere MQ from IBM, OpenJMS to name a few. For the purpose of this tutorial we will use ActiveMQ as the JMS provider.
Installation and configuration of ActiveMQ is pretty simple.
- Download binary release for the specific platform from this link http://activemq.apache.org/.
- Unzip the downloaded file to a specific folder.
- Start ActiveMQ using the below command on a terminal window.
- Test if ApacheMQ is running correctly by checking if it is listening on port 61616.
- ApacheMQ can be monitored through the Web Console using this url http://localhost:8161/admin. Username and password is admin/ admin.
C:\Installs\ApacheMQ\bin\activemq start
  C:\Users\dummy>netstat -an | find "61616"
  TCP    0.0.0.0:61616    0.0.0.0:0     LISTENING
  TCP    [::]:61616       [::]:0        LISTENING
JMS Producer Example
In the JMS Producer application we use a ActiveMQ connection factory object to create a Connection to the underlying messaging system. Then we create a context for sending messages using the Session object. Then we create a Topic instance to get publish and subscribe behaviour. MessageProducer is used for sending messages. Note. Include "activemq-all-5.10.0.jar" available in the ActiveMQ installation directory as an external jar to the JMS Producer project.
import javax.jms.*;

import org.apache.activemq.ActiveMQConnectionFactory;

public class PublisherMain {

  public static void main (String[] args) {

    ConnectionFactory connectionFactory = null;
    Connection connection = null;

    try {
      // Get a connection for sending messages
      connectionFactory = new ActiveMQConnectionFactory();
      connection = connectionFactory.createConnection();
      connection.start();

      // Create a session
      Session session = connection.createSession(false,Session.AUTO_ACKNOWLEDGE);

      // Create a topic and send messages
      Topic topic = session.createTopic("test1");
      MessageProducer producer = session.createProducer(topic);
      while ( true ) {
        TextMessage message = session.createTextMessage();
        message.setText("This is a test JMS Message");
        producer.send(message);
        Thread.sleep(10000);
      }
    } catch (JMSException e) {
      e.printStackTrace();
    } catch (InterruptedException e) {
      e.printStackTrace();
    }
    finally {
      try {
        connection.close();
      } catch (JMSException e) {
        e.printStackTrace();
      }
    }
  }
}
JMS Consumer Example
In the JMS Producer application we use a ActiveMQ connection factory object to create a Connection to the underlying messaging system. Then we create a Session context and subscribe to the topic. MessageConsumer is used for receiving messages. Note. Include "activemq-all-5.10.0.jar" available in the ActiveMQ installation directory as an external jar to the JMS Consumer project.
import javax.jms.Connection;
import javax.jms.ConnectionFactory;
import javax.jms.JMSException;
import javax.jms.MessageConsumer;
import javax.jms.Session;
import javax.jms.TextMessage;
import javax.jms.Message;
import javax.jms.Topic;
import org.apache.activemq.ActiveMQConnectionFactory;

public class ListenerMain {

  public static void main(String[] args) {
    ConnectionFactory connectionFactory = null;
    Connection connection = null;
    try {
      // Get a connection for receiving messages
      connectionFactory = new ActiveMQConnectionFactory();
      connection = connectionFactory.createConnection();
      connection.start();

      // Create a session
      Session session = connection.createSession(false,Session.AUTO_ACKNOWLEDGE);

      // Create a topic and subscribe
      Topic topic = session.createTopic("test1");
      MessageConsumer consumer = session.createConsumer(topic);

      // Receive the messages and print
      while ( true ) {
        Message message = consumer.receive();

        if (message instanceof TextMessage) {
              TextMessage textMessage = (TextMessage) message;
              System.out.println("Received message: "
                      + textMessage.getText());
        }
      }
    } catch (JMSException e) {
      e.printStackTrace();
    }
    finally {
      try {
        connection.close();
      } catch (JMSException e) {
        e.printStackTrace();
      }
    }
  }
}
This program produces the following output.
Received message: This is a test JMS Message
Received message: This is a test JMS Message
Received message: This is a test JMS Message
Received message: This is a test JMS Message
Read other Java tutorials from here.


0 comments:
Post a Comment